
How To Observe the Planetsby Perry Pezzolanella, MVAS Download page as .pdf |
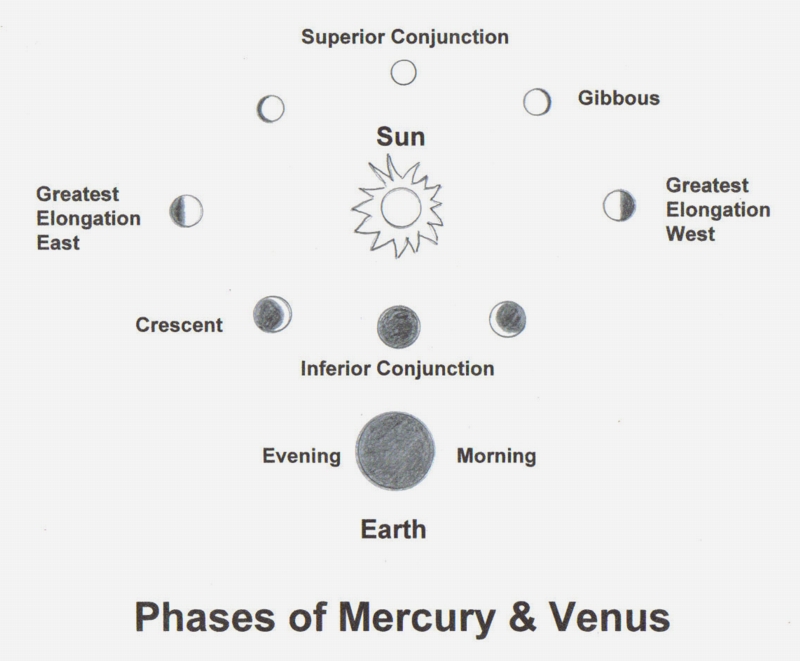
VenusVenus can be the closest planet to Earth (25 million miles), but in spite of its closeness, Venus reveals very little detail because it is completely covered by thick carbon dioxide and sulfuric acid clouds. There is no hope of seeing the towering mountains, rolling plains, or majestic canyons. But there is still much to see and sketch! The Phases: Since Venus orbits the Sun closer than the Earth, it passes between the Sun and us. It can never appear very far from the Sun in our sky and therefore can never be seen all night. As Venus swings from the far side of the Sun towards us, it grows from a small disc to a large, but thin crescent. It can range in size from 10 to 64 arcseconds across and blaze at a magnitude of –4.7. The crescent becomes sliver thin as Venus drops out of the evening sky and passes between the Sun and us. It then appears in the morning sky shrinking in size as it goes from a thin crescent to a disc as it heads for the far side of the Sun again. The phases can be seen with a small telescope while the crescent can be seen with binoculars. In fact, a few people claim that the very large and thin crescent phase of Venus can be seen with the unaided eye! If you have 20/15 vision or better, give it a try! Otherwise, simply enjoy the changing phases through the telescope. Schroter’s Effect: The almanac states when Venus is at half phase (dichotomy), but is it? Do not be surprised if it is already a crescent. Try to observe Venus as much as possible around the time that Venus is predicted to be at dichotomy to determine on which night Venus really is at half phase. This anomaly is called Schroter’s effect after the astronomer who observed it. The planet’s thick clouds may cause it. Do not use a filter since this has an affect on the sharpness of the terminator. In 1991 I coordinated an experiment on the Schroter’s effect with five other members of the Mohawk Valley Astronomical Society. Half phase was predicted to be June 12, but after analyzing the data collected over a period of one month, I calculated it to be June 7. The method and formula were that of the Association of Lunar and Planetary Observers to whom I sent the results. The MVAS and I were given credit in the January 1992 issues of Astronomy and Sky and Telescope for our work! Dusky Markings: These are elusive and I have yet to see them. I am now using a rich blue (W38A) filter to try and see them, but no luck as yet. Try using this filter to see if you can see any faint streaks in Venus’s clouds. They are best seen near the terminator and when Venus is around half phase or a thick crescent. A violet (W47) filter on large telescopes is also helpful. You can use an ultraviolet (W18A) filter if you can find one or a special Venus filter, but these are strictly used for photography. Cusp Caps: I may have observed this during February 1977. This is where one of the crescent’s horns appears unusually bright or blunted. Usually it is the southern horn. Often the cap is bordered by a dark (dusky) collar. This event can last for weeks and should be watched closely as it is most likely caused by the strong circulation patterns in the clouds of Venus. Ashen Light: When Venus is a large, thin crescent there may be a glow on the night side. The cause is not understood, but it is not Earthshine since the Earth is too far away. It may be caused by airglow, thunderstorms, or perhaps even the intense surface temperatures. Ashen light often appears reddish or violet. I have never seen it. Cusp Extensions: Venus has a thick atmosphere and when the crescent becomes sliver thin, the horns can appear greatly prolonged like those on the Turkish Flag. Sometimes there can be tiny, detached points of light at the tips of the horns. Even more beautiful is when the horns unite to form a delicate ring of light around the night side. Try watching for all of these phenomena whenever Venus is near inferior conjunction, a time when Venus is nearly between the Earth and Sun and at its closest and largest. I have seen the prolonged crescent many times. What a beautiful sight to behold! I have yet to see any points of light or the delicate ring. Terminator Deformations: I saw this during August and September 1978. Frequently the terminator will display a serrated edge that can affect the curvature. Use a red (W23A or W25) filter and you will be surprised to see that the terminator has a soft contrast at times. There is a recurring notch near the southern cusp cap that can be dramatic along with a smaller notch in the north. These are what I saw in 1978. A rich blue (W38A) filter also gives the terminator a soft hue and may enhance the dusky notches. This is also most likely caused by the strong circulation patterns in the clouds of Venus. It is surprising that a cloudy planet has so much to offer. Of course, you can go one step further and try to observe Venus in the daytime! It is bright enough to find with binoculars or a telescope. (Be careful of the Sun!) Or, you can try ultraviolet photography, which can capture elusive cloud detail. Infrared photography is new, but is advancing rapidly. The clouds are transparent to infrared allowing the blazing hot surface and coarse topography details of Venus to be seen! The hotter lowlands shine brighter than the cooler highlands in these photos. Observing Venus need not cease around inferior conjunction. Why not follow it into the morning sky? When you look at that bright star on a cool evening (or morning), just remember that you are looking at a world that has 900ºF surface temperatures, sulfuric acid mist, lightning storms, and an atmosphere 100 times heavier than our own! That should inspire you enough to observe, sketch, and photograph Venus! Return to top of page |
|
||||||
 |
||||||
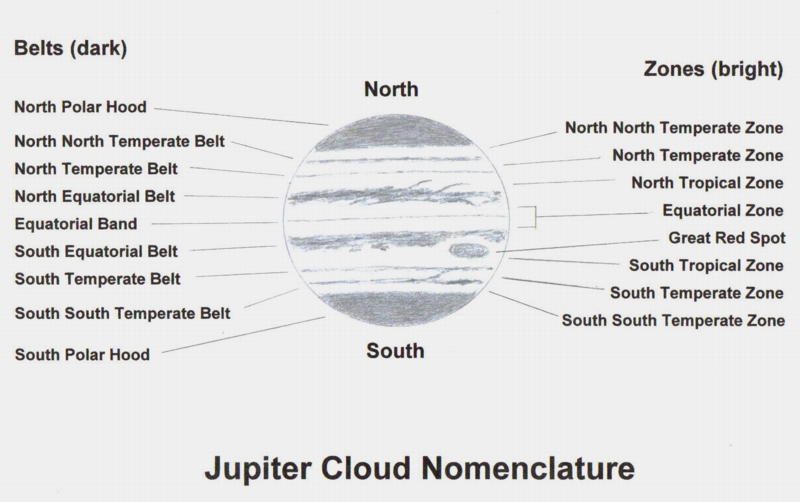
Belts, Zones, and Hoods: These are the most prominent features on Jupiter and even the smallest and cheapest telescopes can reveal them. The dark bands are called belts and run parallel across Jupiter due to its strong winds and rapid rotation. The belts are areas of cool sinking air that is warming up and drying out, revealing a clearing into the darker depths. The lower, yellowish-tan clouds are composed primarily of sulfur compounds and water droplets. The bright stripes are called zones and are areas of rising air that condense into billowing whitish clouds consisting primarily of ammonia ice. The dusky cloud caps at both poles are called hoods and are usually not as prominent as the equatorial belts. Slight clearing near both poles reveals some of the deeper, darker clouds below, similar to the belts, but are somewhat obscured by ammonia haze. The North and South Equatorial Belts, which are the darkest belts, are located on either side of the equator. Larger telescopes will reveal additional belts and zones. Festoons, Garlands, and Rifts: All of these are usually thin delicate extensions of the belts that finger out into the brighter zones. A festoon bridges the entire width of a zone by connecting two belts. A garland does not connect, but instead forms a hook and may curve all the way back to form a closed loop. Another feature, known as a rift, is a bright bridge of cloud spanning from one zone to another across a dark belt. Ovals, Spots, and Knots: Ovals are noncircular patches that are usually very bright and fairly large. Spots are rounder and more sharply defined, but small. Knots are thickenings or a darkening found in parts of the belts. The most famous spot of all is the Great Red Spot. It is a huge storm of towering clouds similar to a hurricane that is colored red possibly from phosphine being churned up from far below. The Great Red Spot is over twice the size of Earth and sometimes grows redder and at other times fades to a pale salmon hue. Sometimes the Great Red Spot becomes so faint that only a dent remains in the South Equatorial Belt, within which it resides. This dent is known as the Great Red Spot Hollow. In recent years the Great Red Spot has become prominent enough to reveal some finer detail within it. A smaller red spot, known as Red Junior, recently formed and has become quite prominent. Jupiter is a world of weather where the clouds can change nightly. Sometimes a belt may split or even disappear completely such as was the case for the South Equatorial Belt during 1989-90. In this instance the Great Red Spot appeared vivid and obvious even in smaller telescopes as it did not have to compete with the darker belt in which it always resides. Many other features can be seen such as the shading along the entire edge of Jupiter’s globe. This is due to the Sun’s slanting angle into the deep atmosphere. The most defining feature of Jupiter can often be overlooked at first, which is the fact that it is not truly round. It appears slightly squashed at the poles due to its rapid rotation and the shape is known as an oblate spheroid. Most of the time Jupiter will appear 100% illuminated because it always orbits far beyond Earth, but at certain times it can appear about 98% lit which will give one edge of the globe more pronounced dusky shading. Filters are valuable when observing any planet as they can bring out fainter detail that would otherwise be invisible. The best filter for Jupiter is green (Wratten #58) as it enhances the cloud belts and especially the Great Red Spot. It also reveals the limb shadow along the edge of the planet more readily and will make it easier to see a moon passing in front of the darker clouds. The Moons: Four large moons can easily be seen orbiting Jupiter, but all the other roughly sixty moons are too small and too faint. These four large moons known as the Galilean Moons: Callisto, Ganymede, Europa, and Io, were named after the famous astronomer who discovered them, Galileo Galilei. It is fun to watch them change positions from night to night. It is possible to determine how long it takes each to orbit once around Jupiter by plotting their positions nightly. Other interesting activities include watching the moons disappear and reappear from behind Jupiter or its shadow, watching them cross in front of Jupiter, and watching their tiny shadows cross the face of the planet. It is possible on nights of excellent seeing to be able to distinguish the varying sizes of each moon. During nights of superb seeing with a larger telescope it might even be possible to detect faint detail on Ganymede, although it will be a challenge. If a moon can be seen in front of Jupiter, it might be possible to detect some color. Callisto is the darkest moon and will appear ruddy. Ganymede may appear dusky gray. Europa is an icy world and probably will appear white. Io is a sulfur-stained volcanic world and may have a yellowish tint. These colors will all be subtle, so try to observe them against Jupiter in order to cut down their contrasting glare against the blackness of space. Jupiter provides a wealth of detail for even the smallest telescope. With regular observing, more detail will pop into view. After a few hours, it will be easy to see changes as a new area of the planet comes into view. The Great Red Spot varies in intensity and stays in view for only a few hours, which gives a great sensation of Jupiter’s swift rotation. Sketching Jupiter is easy and fun. Try this:
Jupiter is slightly squashed at the poles from the rapid rotation. Unless you have a template or want to frame a sketch, or submit it to a magazine, then a circular disc will do fine. Keep in mind that the eye always sees more than any camera. A good project would be to make a strip sketch of Jupiter. This is the globe of Jupiter unrolled into a long strip. By sketching only the details near the center of a line running from the north and south poles every half-hour, a remarkably detailed map can be made. Do this on a night when ample time is available. Filters are very helpful to increase contrast. My favorites are: very light blue (#82A), yellow (#12), and green (#58). A green filter really does the trick; it makes the Great Red Spot easier to find, makes it easier to see limb darkening and moons passing in front of Jupiter. When it comes to observing, sketching, and photographing the planets, Jupiter is the most interesting of them all. Return to top of page |
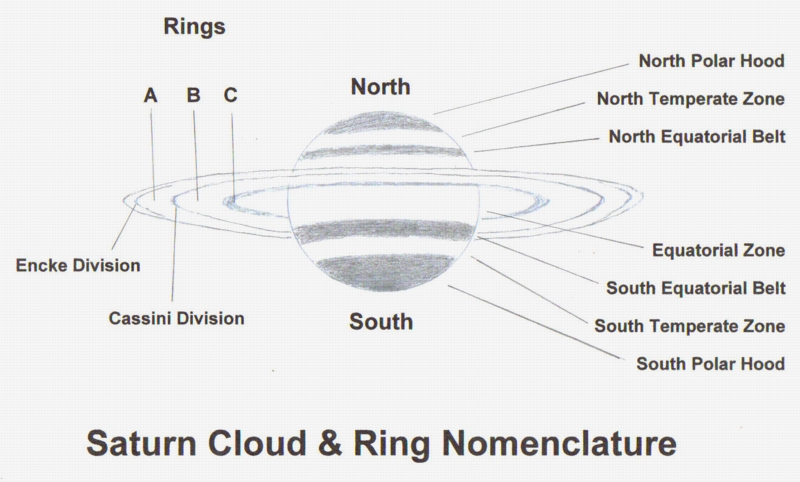
SaturnThe most beautiful sight in a telescope has to be Saturn. The golden globe surrounded by the razor sharp, icy white rings set against the blackness of space is a sight to behold and is a satisfying sight in itself. Dedicated observers scrutinize Saturn closely in order to see detail on the globe and rings. There is actually much more to be seen than is apparent. The following is a guide to what to look for. The Globe: Saturn’s globe is noticeably oblate and can be easily observed when the rings are edge-on. The diameter through its poles is about 10%, or about one Earth diameter less than through the equator. This is due to its low its density, less than water, and rapid rotation of about 10 hours, 38 minutes. Saturn is a completely cloudy world with no visible solid surface and the only details visible are subtle cloud features. The most prominent features are the Equatorial Zone, Equatorial Belts, and the Polar Hoods. The nomenclature for the cloud features is similar to Jupiter, but most of the features are not visible all at once and are very subtle, so a good telescope with steady seeing are essential. The belts are areas of cool sinking air that is warming up and drying out, revealing a clearing into the darker depths. The darker yellow and yellow-tan clouds are composed primarily of sulfur compounds and water droplets. The zones are areas of rising air that create billowing whitish clouds consisting primarily of ammonia ice. Saturn’s rapid rotation and strong winds stretch the clouds out into long belts that wrap completely around the planet. The Equatorial Zone is a wide, bright whitish band that wraps around the equator and is usually partially obstructed from view by the rings, but fully visible when the rings are edge-on. The Equatorial Belts are the darkest features and usually appear tan against the golden globe. These are the easiest features to see with a small telescope but usually only one belt is visible with the other being hidden by the rings. The Polar Hoods are dusky tan and quite large. They appear to grow darker towards the poles. Larger telescopes may reveal thin extensions of the belts that finger out into the brighter zones. A festoon is like a dark bridge that connects two belts across a zone. Garlands hook out from a belt and may hook far enough to close off into a loop. A rift is a bright cloud that bridges two zones across a belt. Ovals may be visible as brighter, noncircular patches in the belts. Knots are darker thickenings within the belts while spots are rounder and more sharply defined. White spots are subtle, but once in a rare while they can be seen with a small telescope. The Great White Spot erupted in 1933 and was seen again in 1990. This was a huge, temporary feature that rapidly elongated within the Equatorial Zone within weeks and stretched around the entire planet. The Great White Spot rivaled the polar ice caps of Mars in brightness and was most likely a huge thunderstorm that erupted and billowed high into the atmosphere. Ammonia gas from the warmer depths froze into brilliant white crystals high up. The Rings: These are the showcase features of Saturn and the most beautiful planetary feature in the Solar System. They are large, but thin and there is plenty to see. When the rings are wide open, look for the dark Cassini Division; it will look like a thin, dark line within the rings. It is hard to believe that this gap is as wide as the Atlantic Ocean! The outer, A ring is not as bright as the inner, B ring and it is important to take note if there are any variations in brightness within the rings. The innermost ring, the C ring or Crepe Ring, is dark and nearly transparent, but may be glimpsed when the rings are widest open as a narrow, dusky band across Saturn’s globe. There is a very thin gap known as the Enke Division located near the outer edge of the A ring and is a challenge to see even in larger telescopes. The famous spokes that the Voyager and Cassini spacecraft have seen are worth looking for as amateur equipment becomes more advanced. Take notice that at certain times when the rings are sufficiently open it is possible to see the shadow of the globe on the rings and the shadow of the rings on the globe. The edge-on rings are also interesting to observe and great care should be taken to note if the rings reveal any brighter clumps when nearly edge-on. It is also interesting to note the dark line that crosses Saturn when the rings appear to be missing. Try to determine if the line is smooth or clumpy, but do not confuse any of the moons for a clump. With the rings nearly gone it will be easier to see the fainter inner moons. It is also the time to observe the transits, eclipses, occultations, and shadow transits of the moons. |
 |
The Moons: Up to eight moons can be seen orbiting Saturn: Mimas, Enceladus, Tethys, Dione, Rhea, Titan, Hyperion, and Iapetus, but Mimas and Hyperion will require a large telescope as both are very dim. The easiest moon to see is Titan as it is the brightest at about magnitude +8.3. If it can be seen transiting Saturn, it might be possible to detect an orange color that is due to its smoggy, organic atmosphere. Iapetus is the odd, two-toned world that has one side bright as snow and the other as dark as coal. This makes it easier to see when it is on one side of Saturn than the other as its magnitude ranges from +10 to +12. Rhea is closer in than Titan, but rather easy to see at 10th magnitude. Still closer to Saturn is Dione followed by Tethys and both are a little dimmer than Rhea. Enceladus is a little closer to Saturn than Tethys, but at a dimmer magnitude of about +11 it is a challenge. It can be seen with a high-quality 4” refracting telescope. Mimas is the closest and very dim at magnitude +13 while Hyperion orbits just a little beyond Titan and is very faint at magnitude +14. Observing these two moons is regarded as a major accomplishment. Filters are valuable when observing any planet as they can bring out fainter detail that would otherwise be invisible. The best filter for Saturn is yellow (Wratten #12) as it enhances the cloud belts and polar hoods. It also increases the contrast of the rings against the globe and the limb shadow along the edge of the planet. No matter what year it is, Saturn is always the most beautiful of all the planets and reigns supreme when observing alone or in the company of others. |
Uranus and NeptuneUranus and Neptune are often overlooked because they are dim and considered too remote to seriously observe; however, under clear, moonless nights away from city lights, and with good finder charts it is surprisingly easy to find and track these nearly forgotten worlds. Uranus and Neptune are dim because they orbit the Sun at a distance of 1.8 and 2.7 billion miles, respectively. In the dim depths of the outer Solar System, daytime sunlight is no brighter than a clear evening sky on Earth shortly after sunset. Both planets are about four times larger than Earth, slightly over 30,000 miles in diameter, and have thick atmospheres that are completely cloudy. The small amount of methane (2%) in Uranus’ atmosphere absorbs the red component of sunlight and scatters the blue creating a turquoise hue. Neptune appears even bluer since it is not as hazy and has more methane (3%). These colors are dramatic whenever they are near stars of contrasting colors. Given a night of steady seeing, a small telescope should be capable of resolving the discs and revealing the colors of these remote worlds; however, both planets are too far away to observe cloud detail or moons unless the telescope has an aperture of at least 16 inches. Uranus is generally 3.7 arcseconds across and shines around magnitude +5.7 and Neptune is generally 2.3 arcseconds across and shines around magnitude +7.8. The planets appear distinctly different with Uranus having a rich turquoise hue while Neptune is a chilly, icy-blue disc. In a large telescope of at least 16 inches Uranus appears as a true turquoise globe instead of a tiny disc and two moons, Oberon and Titania, can occasionally be seen within its glare. The other three rather large moons of Uranus: Umbriel, Ariel, and Miranda, are more difficult to see and all five moons shine dimmer than Pluto at magnitude +14 to +15. Neptune appears like a tiny bluish globe with magnitude +13.5 Triton shining dimly nearby. There are several fun projects for each planet, which include photographing each on every clear night possible to determine if there is a fluctuation in brightness. This could reveal evidence of bright clouds or dark spots. Neptune is notorious for rapidly changing cloud belts and spots and now Uranus is growing active as sunlight shines more directly on its equator. No actual cloud detail can be seen, or can it? Recent amateur photography has improved to the point where some large features, such as a bright polar hood on Uranus, have been photographed. A magnification of at least 500x for Uranus and 900x for Neptune along with a yellow-green (Wratten #11) filter are required in order to have a chance at photographing any detail. Uranus and Neptune do not reveal the riot of detail that Jupiter displays nor do they have vivid, icy white rings like Saturn, but both are beautiful and mysterious in their own right. Neither one of these worlds should be passed up during a planetary observing session when they are visible. |